Are you looking for step by step guide to add a plugin to WordPress website? The first thing every new WordPress user wants to know after installing WordPress is how to install a WordPress plugin? Before installing a plugin in your WordPress website, remember only self-hosted WordPress allows you to install WordPress plugins. You cannot install WordPress plugins from 3rd party developers on a website if it is hosted on WordPress.com.
If you’re a new WordPress user, you might not be aware of how essential plugins are for your website. First, let’s define what is a plugin? A plugin is a PHP script, or you can say software that can be easily installed and extends the functionality of the WordPress website by adding new features to your websites like shopping cart, live chat support, website speed improvement, and more. Also, the enormous amount of free and paid plugins are available for the convenience of WordPress users.
In this guide, we will explain five different methods for installing a WordPress plugin that will be useful for a beginner as well as for expert-level users.
How to Install a WordPress Plugin?
How to install a plugin? You are going to learn it soon. Follow this step by step guide to learn how to install free and paid plugins on WordPress websites. Here are the five methods that we will cover in this guide to install a WordPress plugin.
- Install Free Plugin using WordPress Dashboard Area “Plugin Search” Feature. (For Beginners)
- Plugin Installation using WordPress Dashboard Area “Plugin Upload” Feature. (For Beginners)
- Install WordPress Plugins Manually using FTP. (For Intermediates)
- WordPress Plugin Installation using cPanel. (For Intermediates)
- Install WordPress Plugin using WP-CLI. (For Experts)
Let’s take a look at these five methods one by one to install WordPress plugins.
1. Install Free Plugin using WordPress Dashboard Area “Plugin Search” Feature.
Here’s the easiest way to install a free plugin using a built-in WordPress plugin installer. The only limitation is that the plugin must be available in the WordPress plugins directory, which only has free plugins.
Follow the step by step guide to learn how to install Plugin using WordPress Admin Area “Plugin Search” Feature.
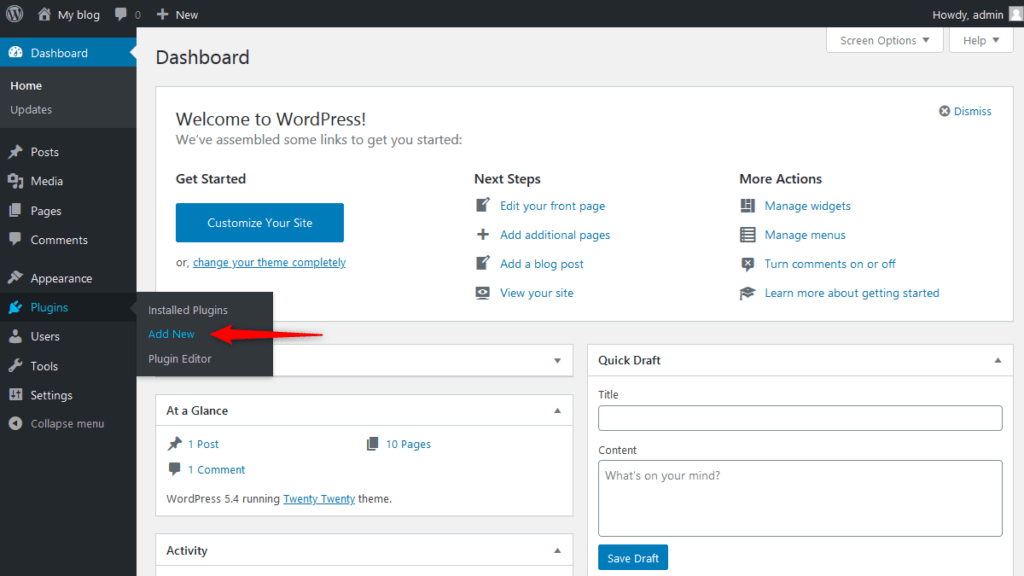
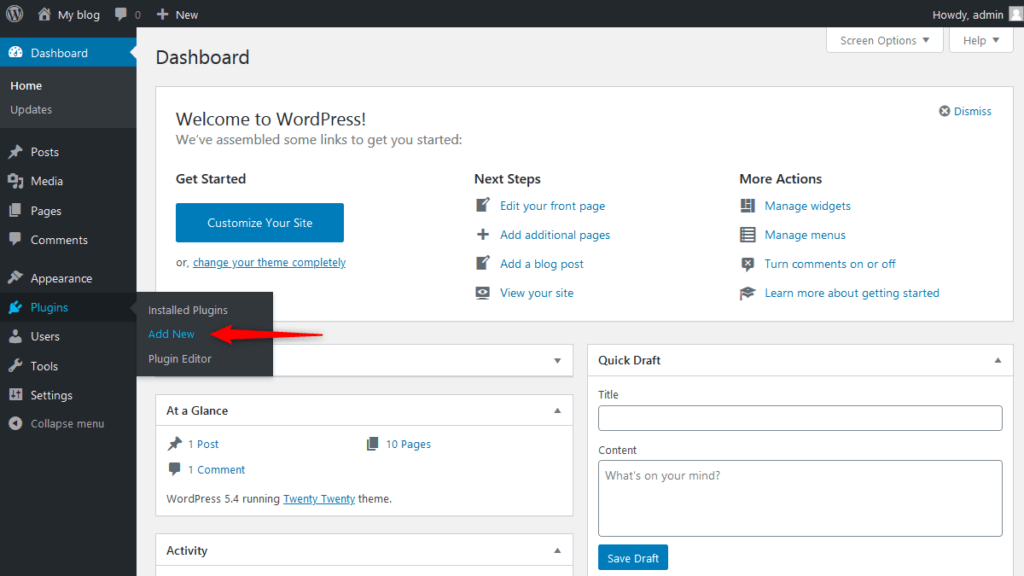
- Under the “Plugins” section in your WordPress Dashboad Area (Dashboard) – Click on “Add New”.
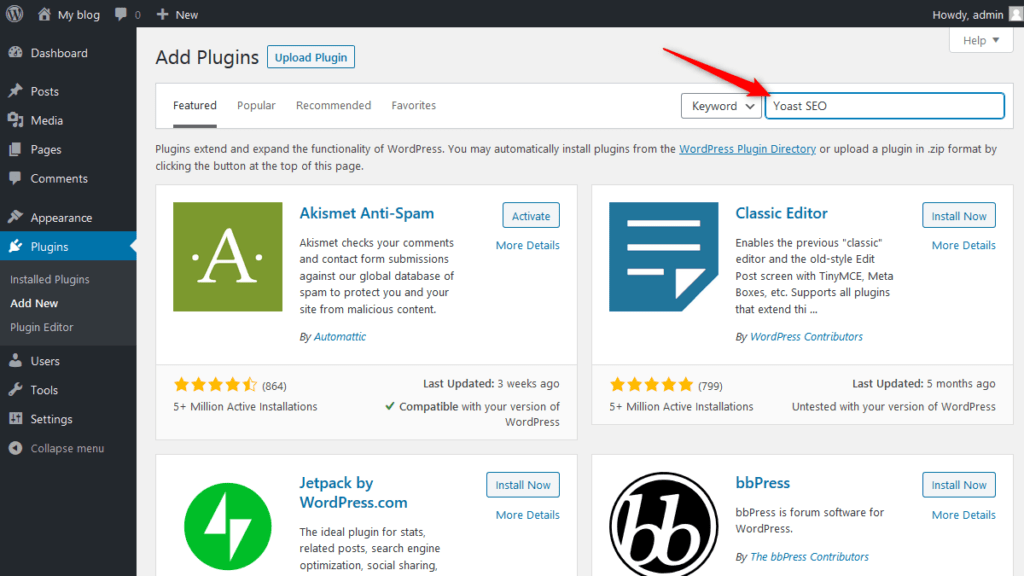
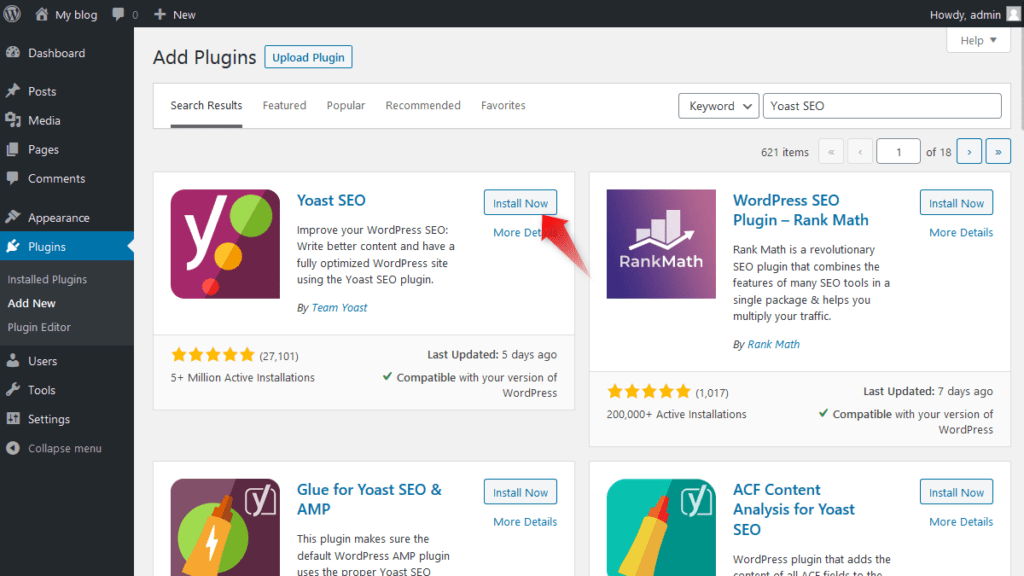
- Search the plugin by typing the plugin name, author name, or the functionality that you are looking for in the plugin’s search bar in the top right. For instance, if you’re looking for Yoast SEO plugin, type Yoast SEO in the search field.
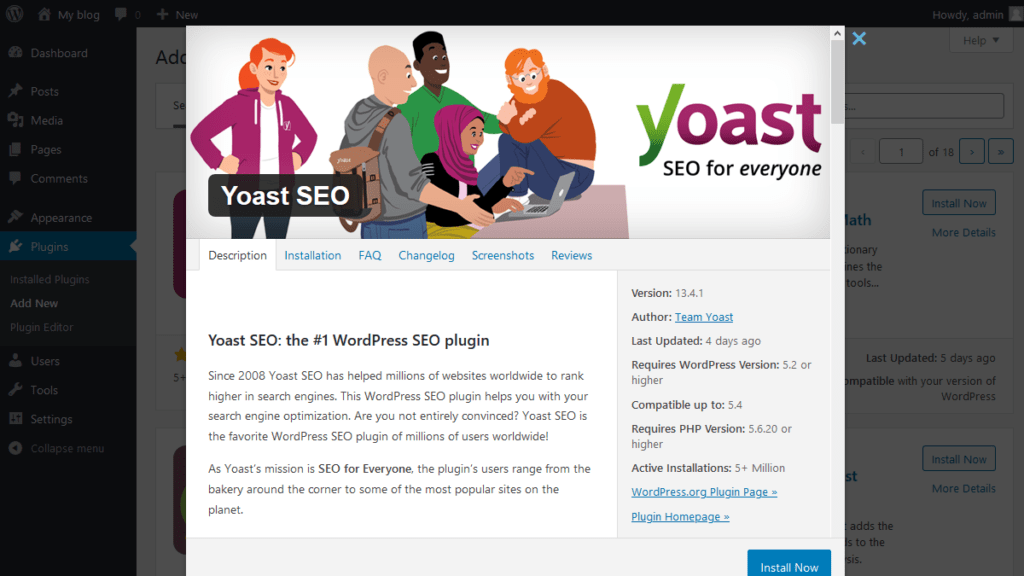
- To read about plugin’s installation and documentation click on “More Details” button of the respective plugin.
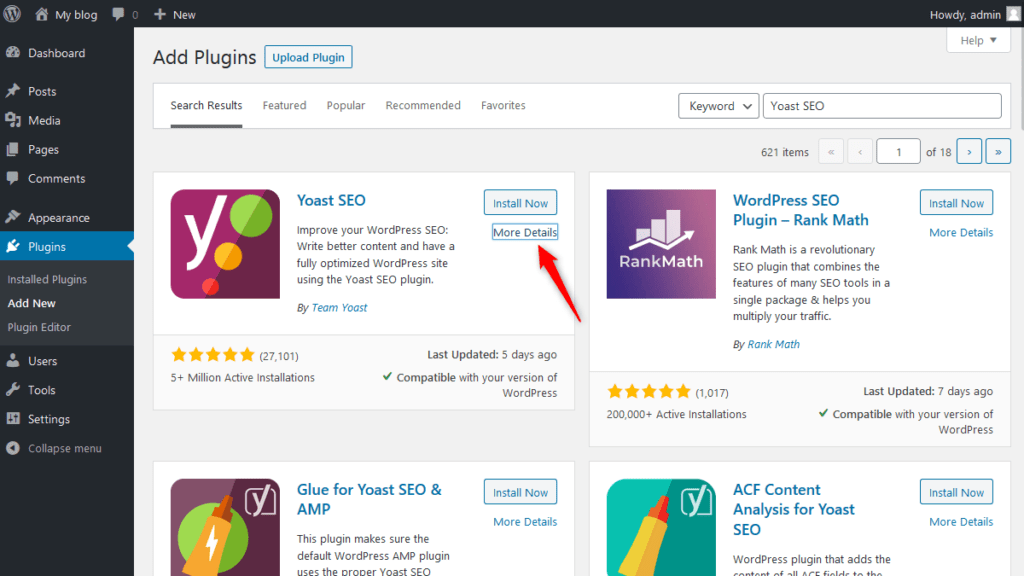 After clicking on “More Details” button, a popup will open which will contain the information about plugin and its documentation.
- Now to install the plugin click on “Install Now” button.
- Once the plugin has been installed, the “Install Now” button will change to “Activate”. Click on the “Activate” button to activate the plugin successfully.
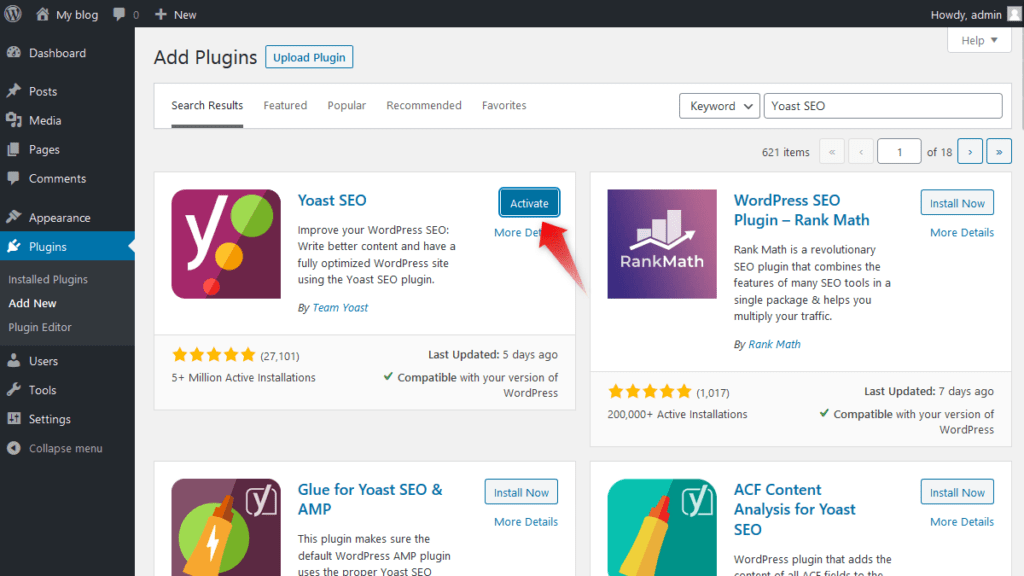
After activation, your plugin is ready to use. Now you know the process of installing the WordPress plugin. It is as easy as Search & Install.
Now how to configure the plugin’s settings? This method varies from one plugin to another. As this post is about general plugin installation, so we’re skipping this information here
2. Install Plugin using WordPress Dashboard Area “Plugin Upload” Feature.
Do you want to install a premium/paid WordPress plugin to your website? The thing about premium/paid plugins is that you cannot install these plugins from WordPress plugin search as described in method one because paid plugins are not available in WordPress plugin’s repository (Although their free version can be available). So, first, you need to buy the plugin and download it from the source as a zip file, and then you can manually upload that zip file and activate it through the Plugins admin screen, as described below.
Follow the step by step guide to learn how to install a WordPress plugin manually using ZIP file.
- Under the “Plugins” section in your WordPress Admin Area (Dashboard) – Click on “Add New”.
- Click on “Upload Plugin” button on the top of the page. Click on the “Browse” button and select the plugin’s zip file from your computer.
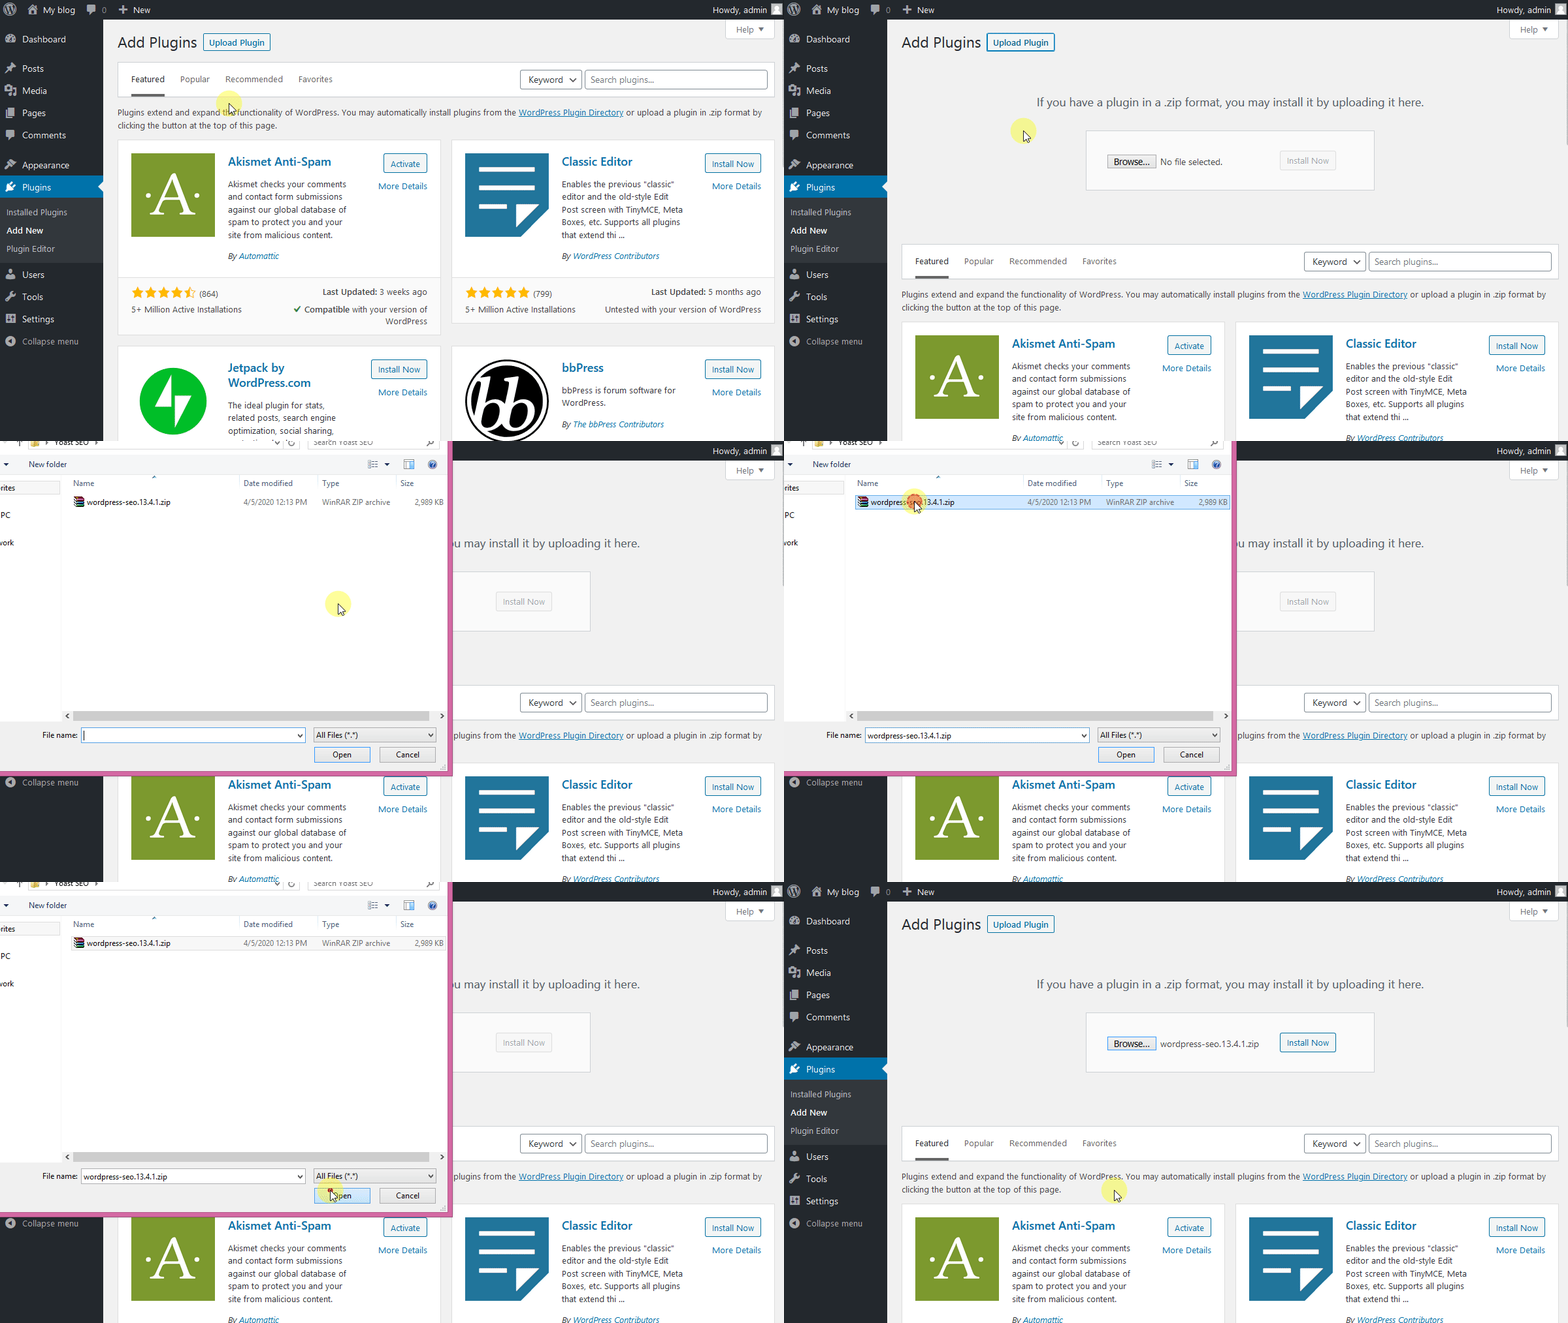
- After selecting the plugin’s zip file, click on “Install Now” button to begin the plugin’s installation.
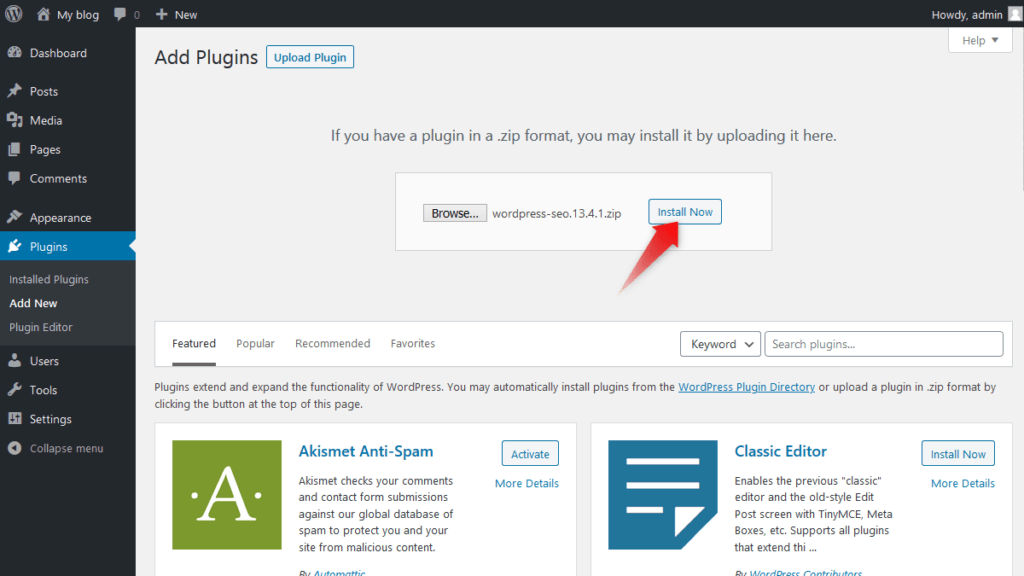
- When the installation is done, “Plugin installed successfully” notification will appear.
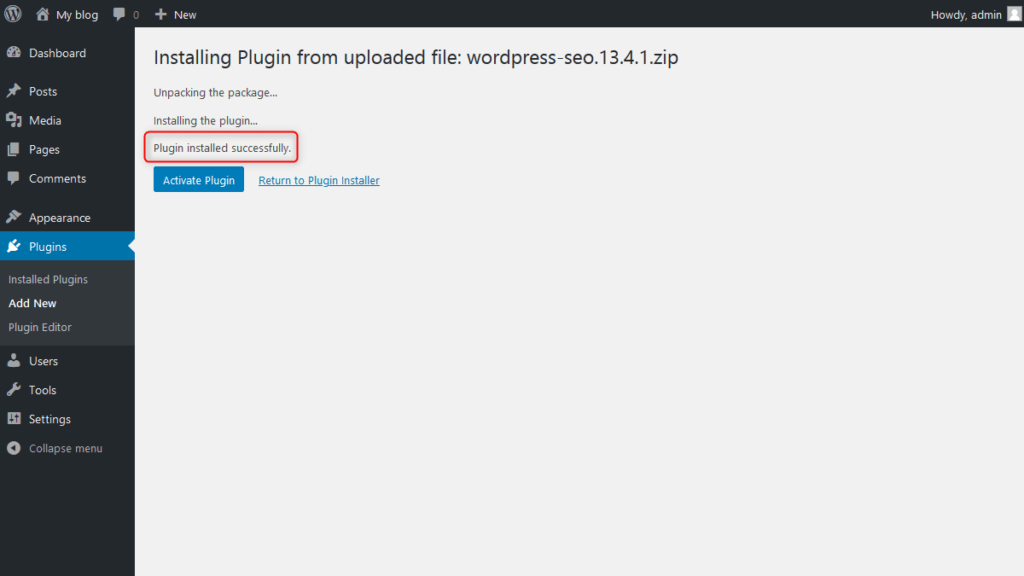
- Click on “Activate Plugin” to activate the plugin successfully. Your plugin is ready to use.
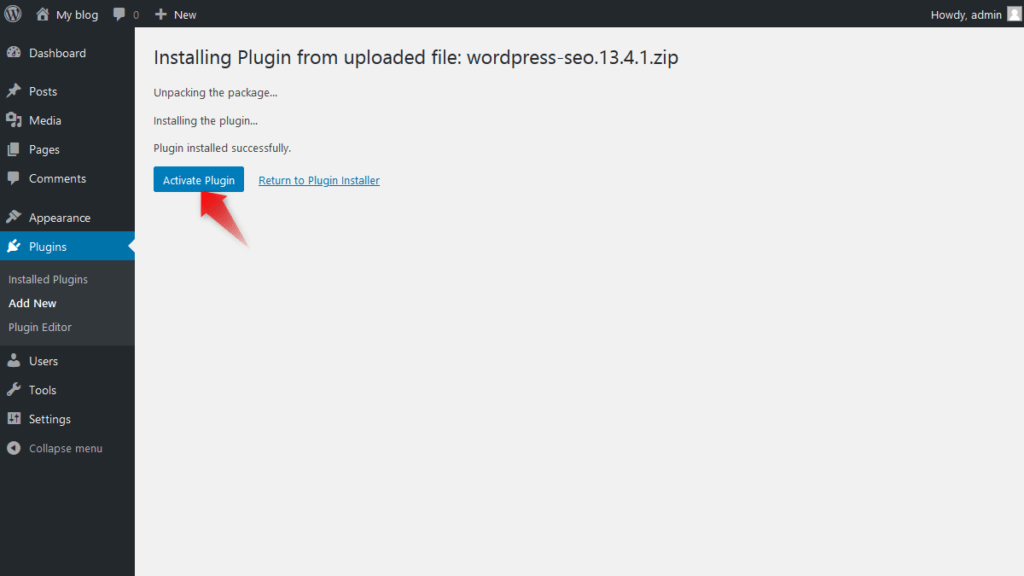
Configure the settings of the plugin as per your needs.
3. Install WordPress Plugins Manually using FTP.
The first two methods are probably the easiest methods to install plugins from the WordPress admin area. But this method is different from the first two methods. In this method, you’re required to install the plugin manually using FTP software such as FileZilla.
You must be familiar with how to transfer files using FTP. However, if you’re a new user, don’t forget to create a backup before installing the plugin as it may damage your entire site if it’s not compatible with your WordPress version or if it belongs to an unreliable source.
Follow the step by step guide to learn how to install WordPress plugins manually using FTP software.
- The First step is to download the plugin’s source file (zip file). Next, unzip the file on your computer. Now you’ll see a new folder named after the plugin (see GIF below for better understanding), the folder that you will have to upload manually to your WordPress hosting using an FTP client.

- Now you have to access your server through the FTP manager. If you do not have FTP login details either you can find it in your web hosting account or contact your hosting provider for more information. Open the FTP on your system and connect to your website using Host name, username, password and port (21 in case of FTP) provided by your hosting provider.
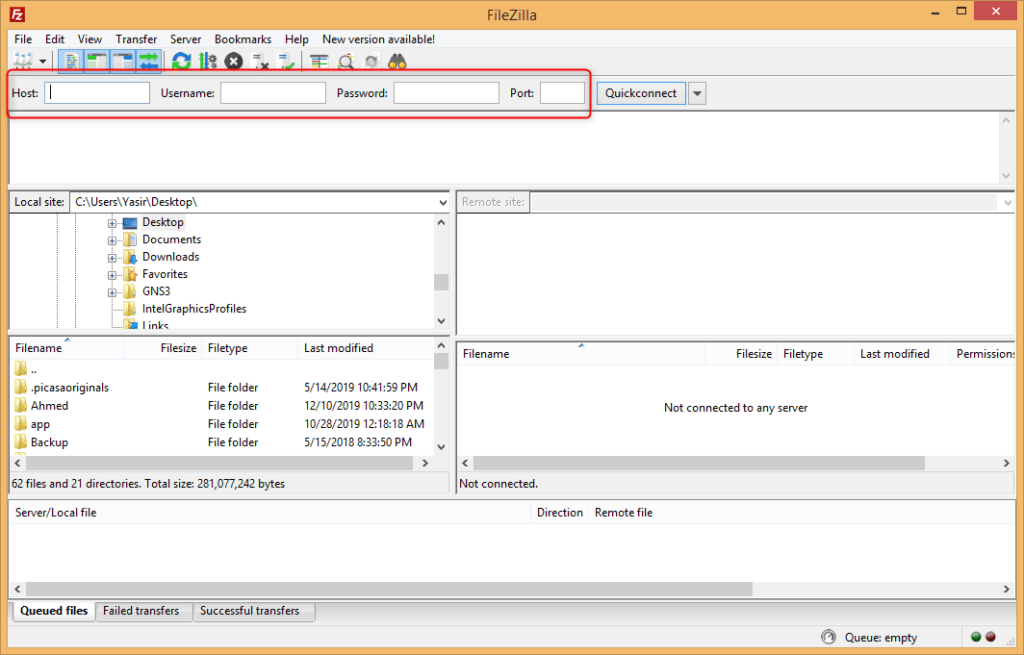
- Once connected, you need to navigate to wp-content/plugins folder. First go to the wp-content folder on your website. In this folder, you will see different folders like plugins, themes, uploads and other folders related to your website. Go to wp-content/plugins/ folder, as WordPress stores all its plugins in plugins folder.

- Then upload the folder extracted from the zip file to the /wp-content/plugins/ folder on your server. This will successfully install the plugin to your WordPress site.

- Go to your WordPress Admin Area (Dashboard) and locate “Installed Plugins” under “Plugins” section.
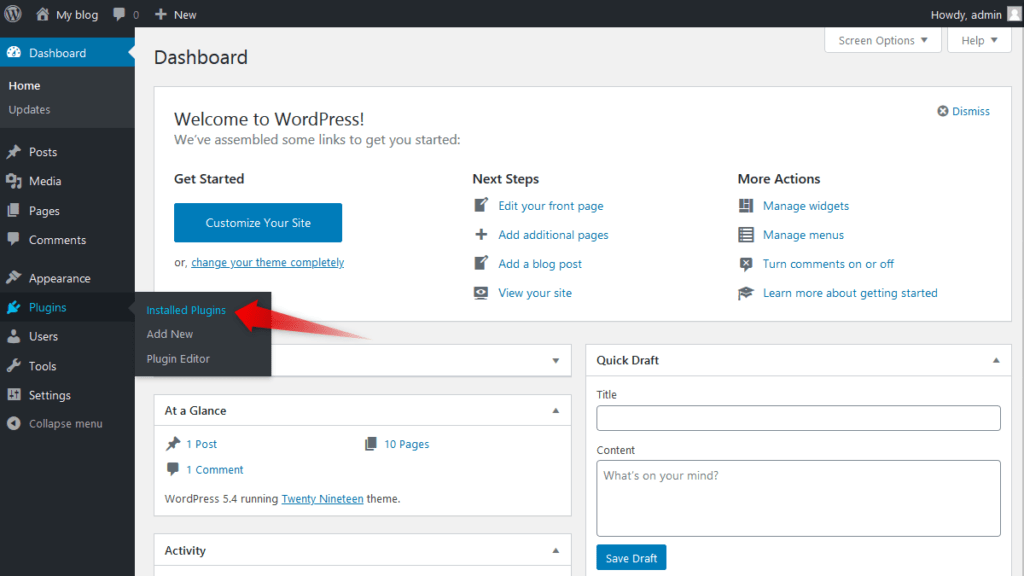
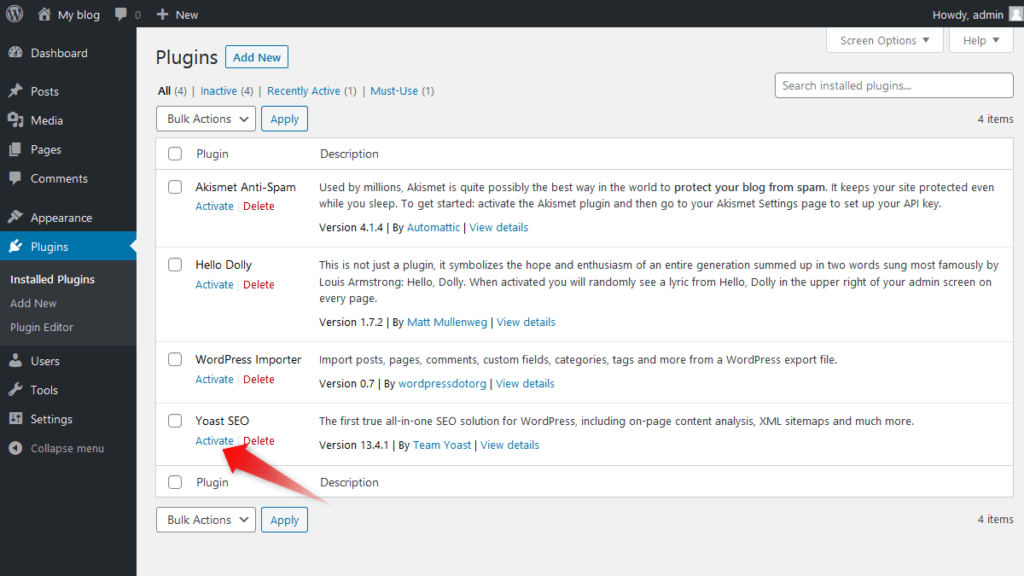
- Click the plugin’s “Activate” link below the plugin. Your plugin is ready to use. Configure the settings as per your needs.
4. Install Plugin using cPanel.
In this method, we will see how to install WordPress plugin using cPanel. So, what is cPanel? cPanel is a web hosting control panel or software, and it helps in the management of a web hosting server. Before using this method, you need to know where WordPress keeps all the plugins. WordPress stores all its plugins, themes, media, and other content in its wp-content folder.
Follow the step by step guide to learn how to install WordPress plugin using cPanel.
- First, you will need the plugin’s zip file. So, that you can upload it to the cPanel where required. If you want free plugin form WordPress plugins directory, you can download the plugin’s zip file from there.
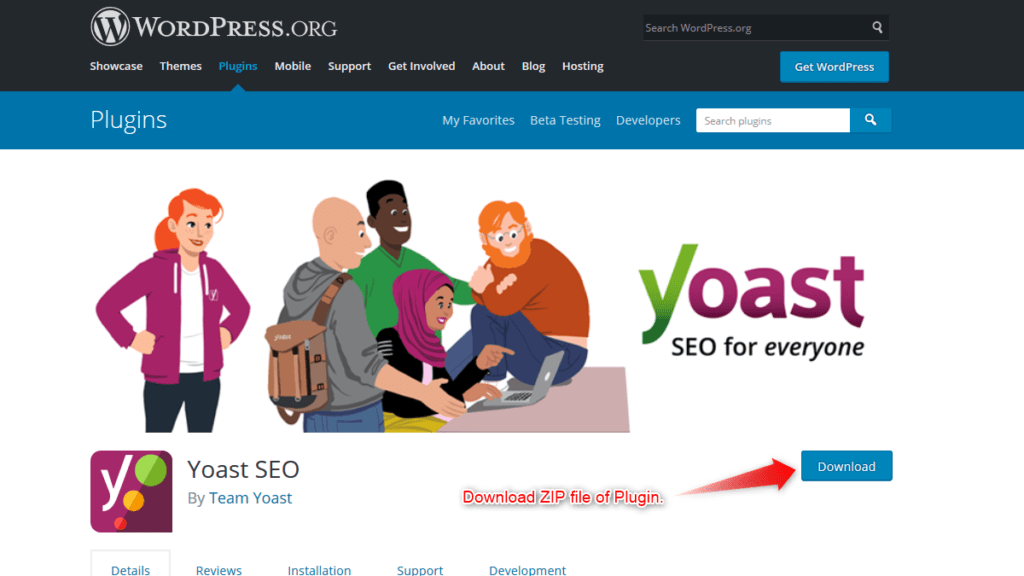
- Now, login into your cPanel account and find the “File manager”. You will probably find it under the “Files” section.

- If there is only one domain on your web hosting server, then most likely, your WordPress website would be installed in the public_html folder. So, navigate to public_html folder by clicking on it.
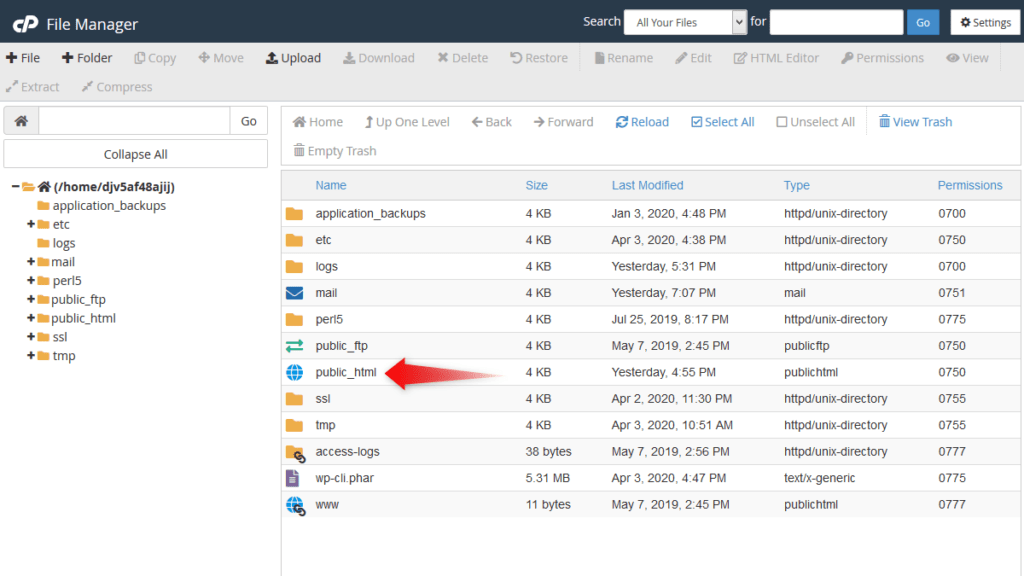
- Here you can see the files that are related to your WordPress installation. WordPress keeps its plugins in the wp-content/plugins folder, so first navigate to wp-content folder.
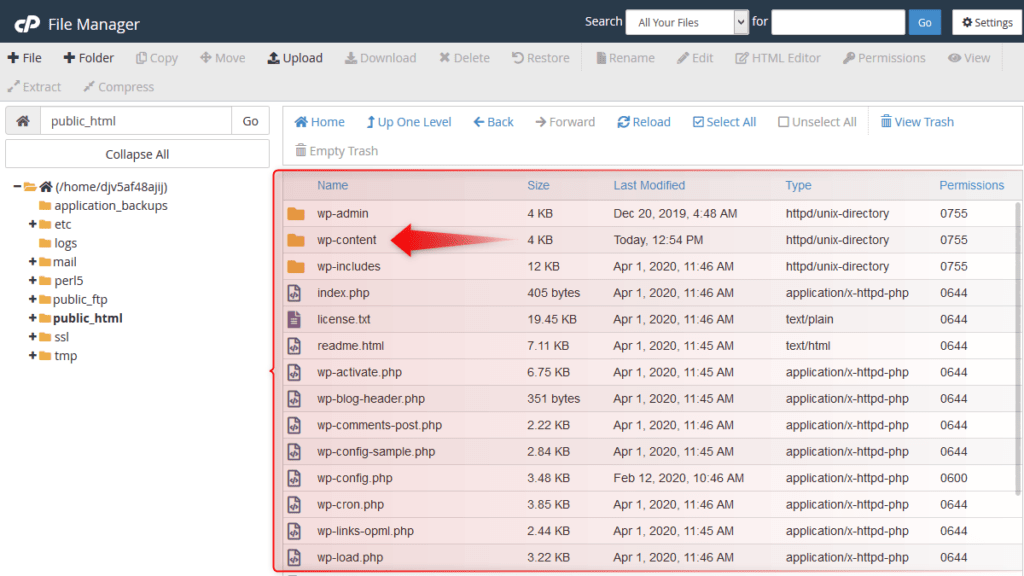
- In the wp-content folder, you will see different folders like themes, plugins, and uploads, etc. To install the WordPress plugin, open the plugins folder i.e., wp-content/plugins/ folder
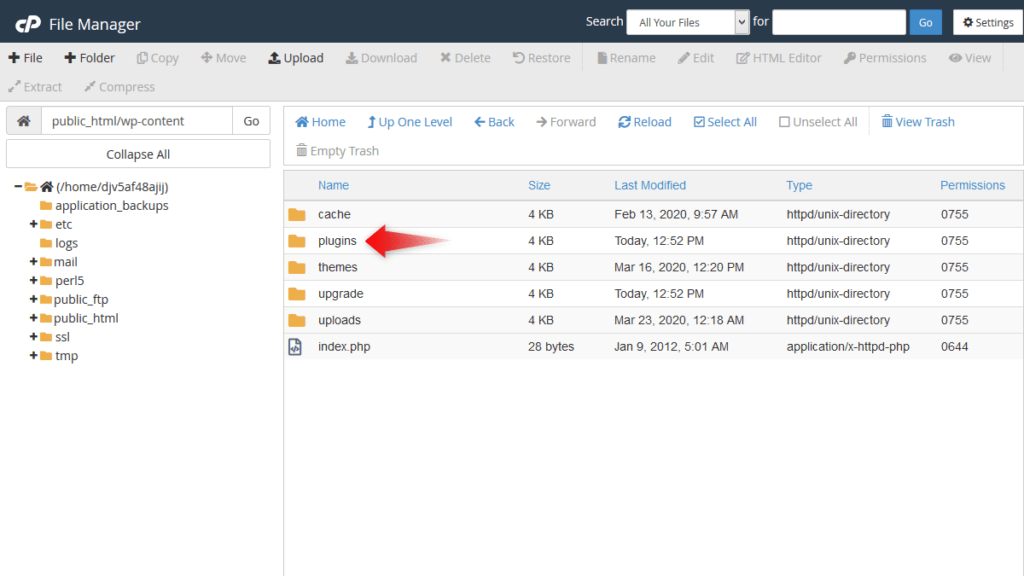
In plugins folder, you will see the plugins that are already installed on your WordPress website.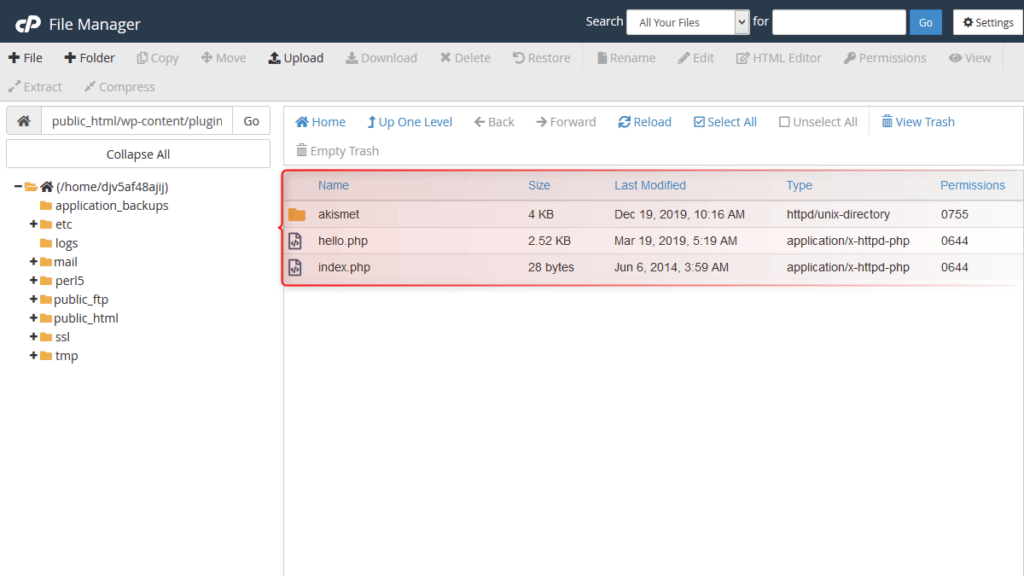
- You’re required to upload the zip file of the plugin here.
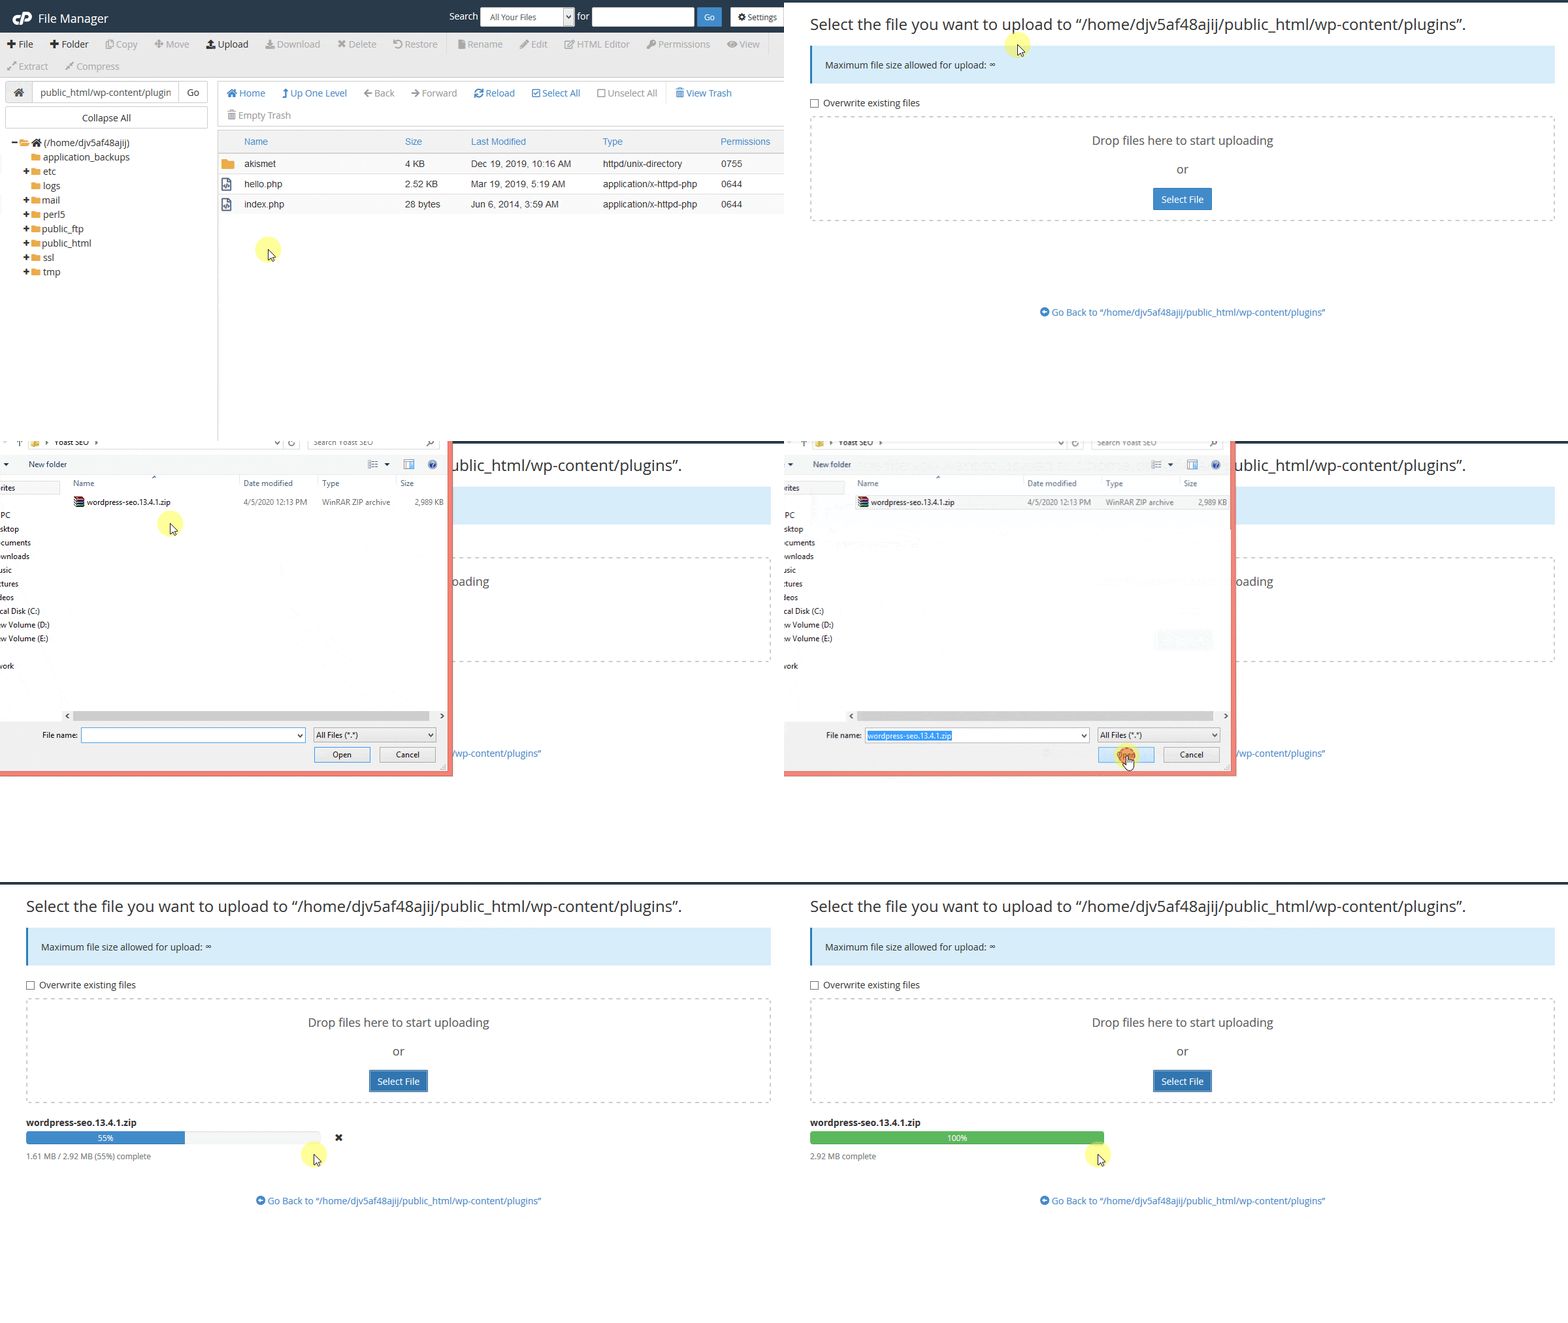
- After plugin’s zip file has been uploaded, right-click on the zip file and click on “Extract”. Extract it in public_html/wp-content/plugins folder (If you have uploaded the zip file in the plugins folder, then default path will be the plugins folder).
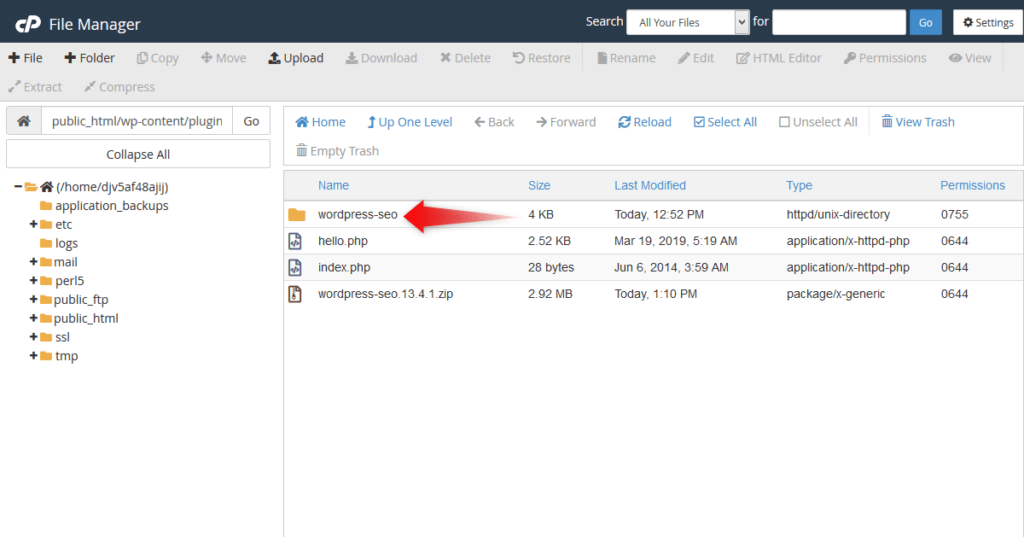
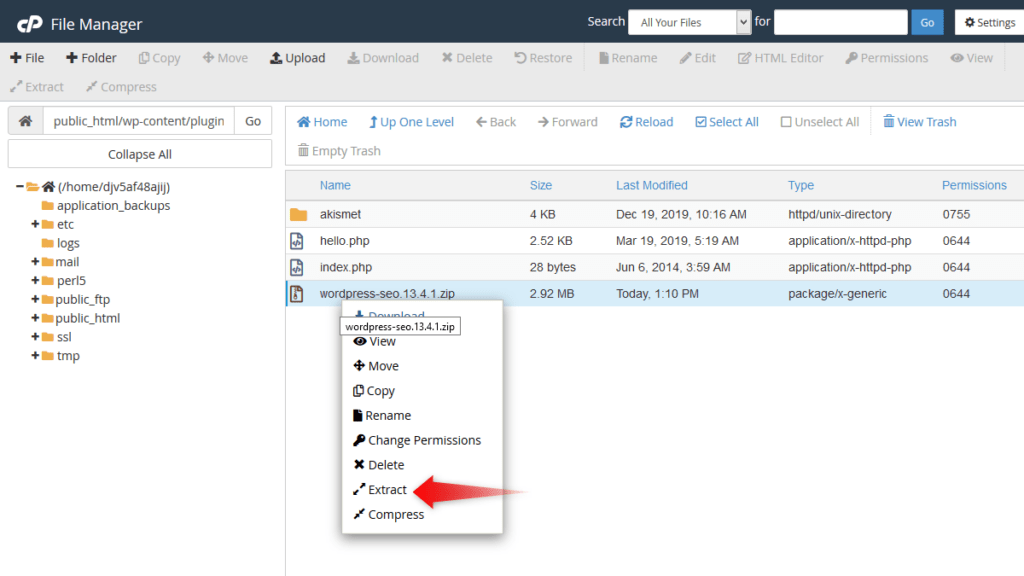 After the completion of extraction process, plugin is now installed on your WordPress website.
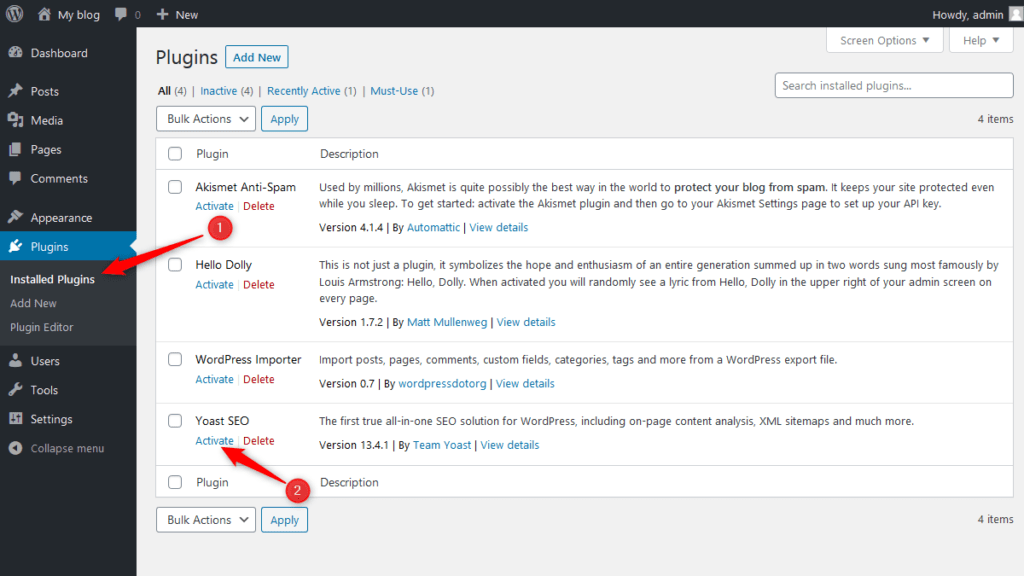
- To activate the plugin, go in your WordPress Dashboard and go to Plugins >> Installed Plugins. Here you will see the plugin that you have installed. To activate the plugin, just click on “Activate”.
5. Install WordPress Plugin using WP-CLI (WordPress Command Line Interface)
Another way to upload and install a plugin in WordPress is through WP-CLI, a tool that gives you command to control your WordPress site with the help of a command-line interface. Use commands to perform tasks like plugin activation/deactivation, installing/updating a theme, or configuring multisite installation without even using a browser.
Follow the step by step guide to learn how to install a WordPress plugin using WP-CLI commands.
- First, connect to your server via SSH as a cPanel user. You can use a software like puTTY or OpenSSH.
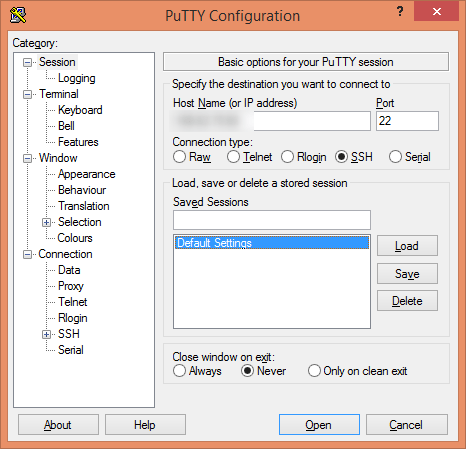
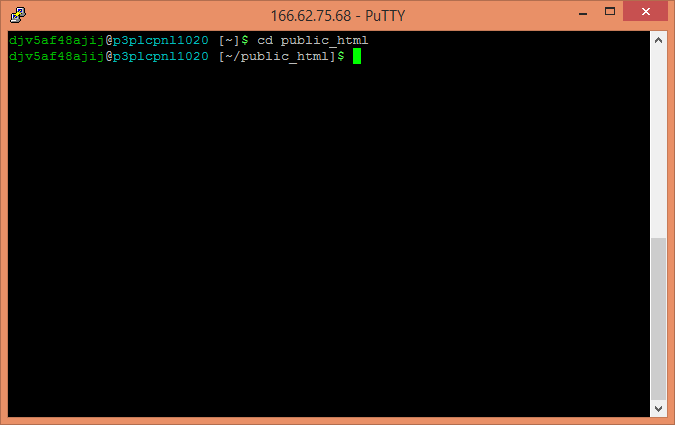
- When connected navigate to the document root directory of your website. For example, if there is only one domain on your web hosting server, then most probably, your WordPress website would be installed in the public_html folder. Navigate to this folder by typing:
cd public_html
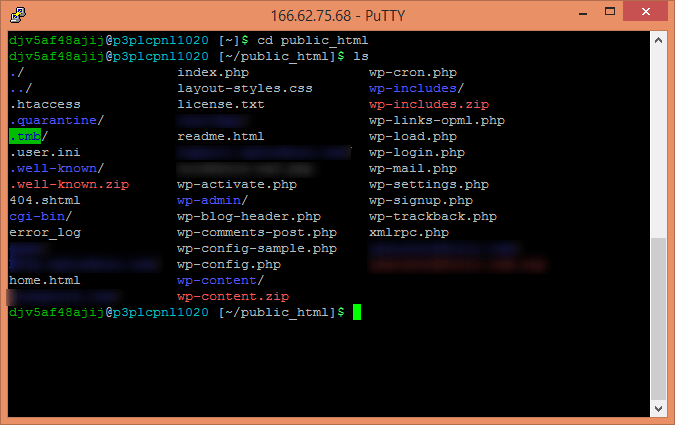
 To confirm that you are at the right place, write ls in Wp-CLI and press enter. It will show the files in the current folder, and if you see WordPress files, then you are in the right place.
- There are various methods to install a plugin using WP-CLI, but we will use the method which just requires the slug of plugin.
To get the slug of a plugin, go to WordPress plugin’s repository and find the plugin you are looking for. Once you find it go to its page. In the browser, you will find the slug of the plugin. For example, we want to install Yoast SEO plugin. So we will go to its page on WordPress.org, and then from the browser URL area, we will copy its slug.
- Now write below-mentioned command in your WP-CLI while you are in the root directory of your website.
wp plugin install wordpress-seo

The WordPress plugin will be installed and you will see a success message in the end. - To activate the plugin write this command.
wp plugin activate wordpress-seo

And that’s all; the plugin has been installed using WP-CLI. WP-CLI is a convenient tool to perform different WordPress related tasks quickly. To get more familiar with WP-CLI, check out the official WP-CLI documentation.
Here in this guide, we have elaborated on the five methods of installing a plugin in detail. No doubt, plugins improve the functionality of the WordPress website. You can add unlimited features to your website with few clicks. So what are you waiting for?
If you like this guide, subscribe us on YouTube for video tutorials. You can also find us on Twitter and Facebook.
