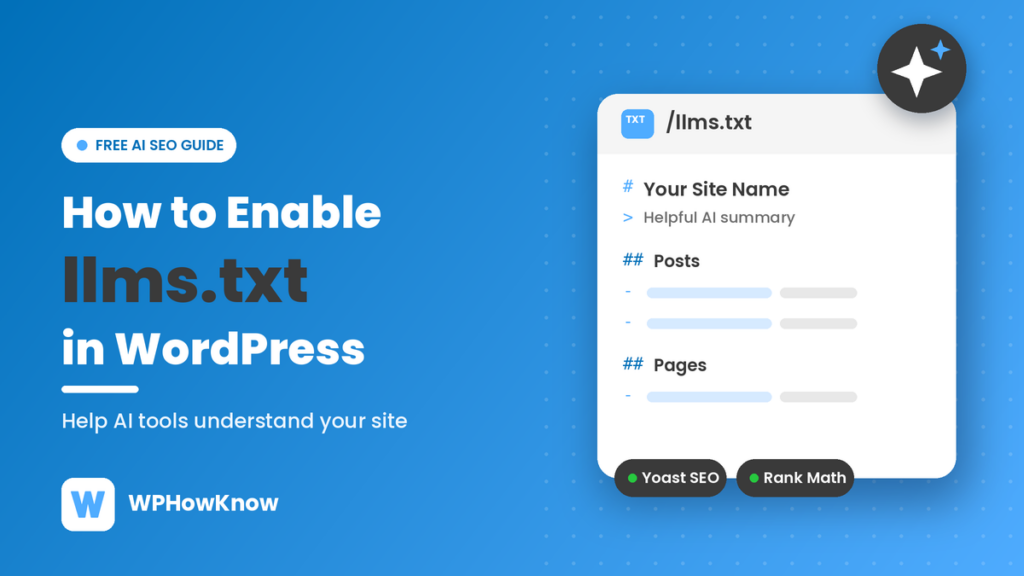
Today, AI tools like ChatGPT, Claude, Gemini and Perplexity now answer a lot of questions that people used to search on Google. So if you want these tools to understand your website better, you can add an llms.txt file to it. The good news is that both Yoast SEO and Rank Math can create this file for you for free, and setting up llms.txt in WordPress takes less than five minutes.
Quick answer: In Yoast SEO, go to Yoast SEO > Settings > Site features, turn on the llms.txt toggle and click Save changes. In Rank Math, go to Rank Math SEO > Dashboard, turn on the LLMS Txt module, then set it up under General Settings > Edit llms.txt. Your file will be live at yoursite.com/llms.txt.
- 1. What Is llms.txt?
- 2. llms.txt vs robots.txt: What Is the Difference?
- 3. Before You Start: Use Only One SEO Plugin
- 4. Method 1: How to Enable llms.txt in WordPress with Yoast SEO
- 5. Method 2: How to Enable llms.txt in WordPress with Rank Math
- 6. How to Check If Your llms.txt File Is Working
- 7. llms.txt Not Working? Common Problems and Fixes
- 8. Conclusion
- 9. Frequently Asked Questions
What Is llms.txt?
First of all, llms.txt is a plain text file that sits at the root of your website, just like robots.txt. Also, it is written in simple Markdown and gives AI tools a short summary of your site along with links to your most important pages, posts and categories.
The idea was proposed in 2024 and is explained on the official llms.txt website. In other words, think of it as a cheat sheet for AI. Instead of crawling your whole website and guessing what matters, an AI tool can read one small file and find your key content quickly.
To be honest with you: llms.txt is still a proposed standard. In fact, it is not an official web standard, and not every AI company has said that its tools read it. So adding it will not magically get your site into ChatGPT answers. However, it is free, takes a few minutes and does not hurt your SEO, which is why both big SEO plugins now include it.
llms.txt vs robots.txt: What Is the Difference?
Many beginners mix these two files up because they both live at the root of your site, but they do very different jobs.
| robots.txt | llms.txt | |
|---|---|---|
| Main job | Tells bots which pages they can or cannot crawl | Points AI tools to your most useful content |
| Who reads it | Search engine and AI crawlers | AI tools and large language models (LLMs) |
| Can it block bots? | Yes, it can ask bots to stay away | No, it only guides them |
| Format | Simple rules like User-agent and Disallow | Markdown with headings and links |
| Status | An established standard | A newer, proposed standard |
In short, robots.txt is about access and llms.txt is about guidance. For example, you can read more about how robots.txt works in Google’s robots.txt guide. If you also want to help search engines understand your content, check our guide on what schema markup is and how to implement it.
Before You Start: Use Only One SEO Plugin
Both methods below give you the same result, a working setup of llms.txt in WordPress. So pick the method for the SEO plugin you already use on your website.
Do not install Yoast SEO and Rank Math together just for llms.txt. This is because two SEO plugins on one site add duplicate meta tags and schema, and both will try to create the same llms.txt file. Instead, if you do not have an SEO plugin yet, see our guide on how to add a plugin to a WordPress website and install just one of them.
Method 1: How to Enable llms.txt in WordPress with Yoast SEO
The llms.txt feature is included in the free version of Yoast SEO, so you do not need Yoast Premium.
Step 1: Open Yoast SEO Site Features
- First, log in to your WordPress dashboard.
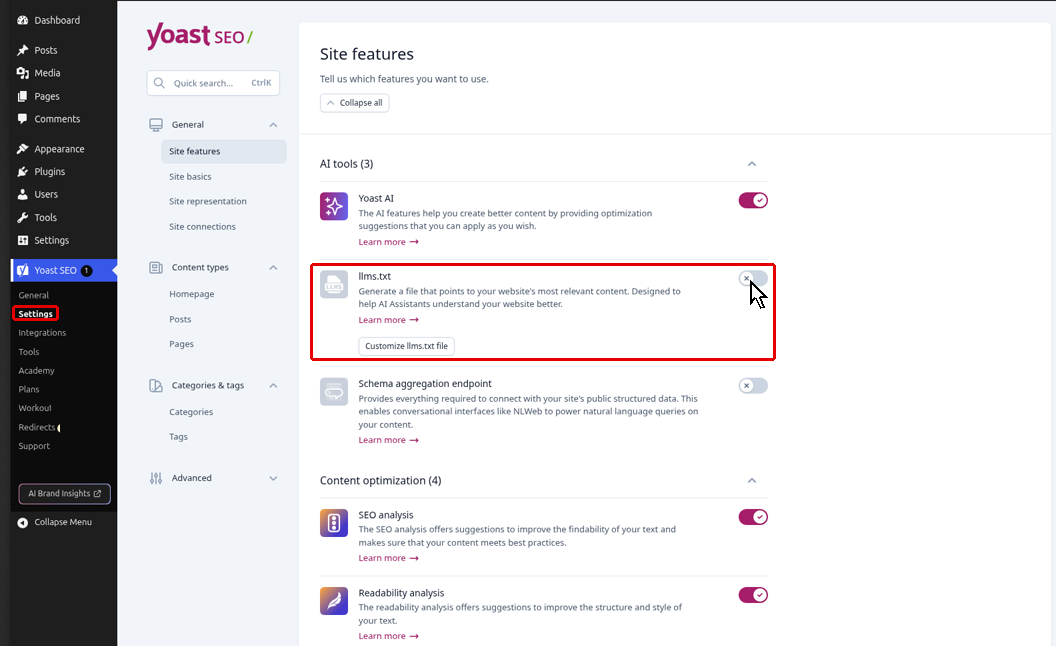
- Then, in the left menu, go to Yoast SEO > Settings. The Site features page opens by default.
- Next, scroll to the AI tools section and find the llms.txt card. It says “Generate a file that points to your website’s most relevant content.” By default, its toggle is off.
Step 2: Turn On llms.txt and Save
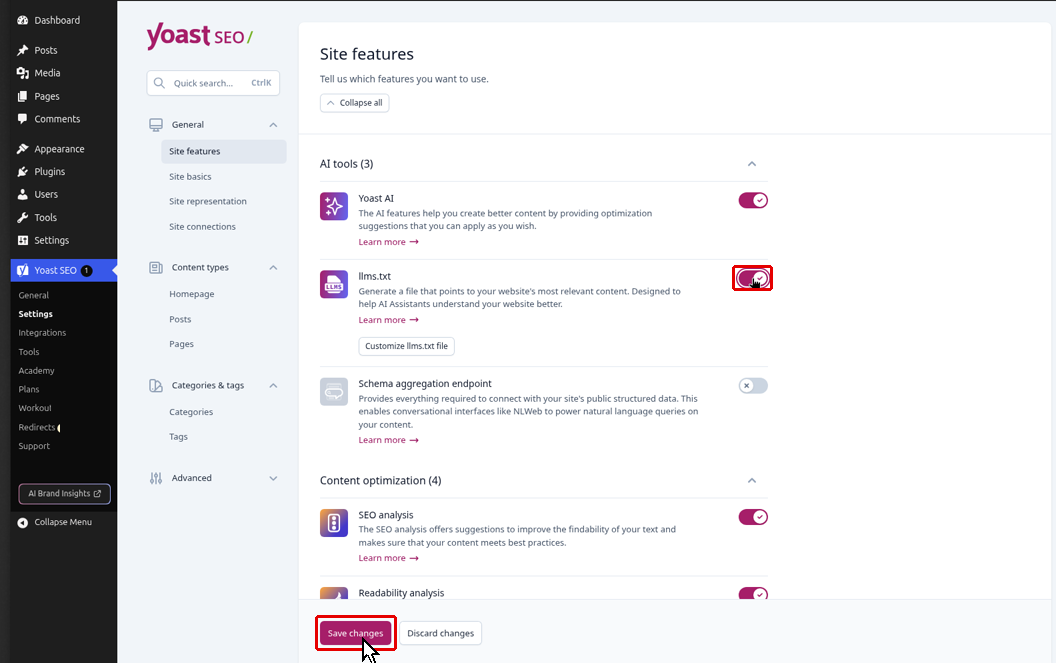
- Click the toggle on the llms.txt card. It turns purple with a check mark when it is on.
- After that, click the Save changes button at the bottom of the page.
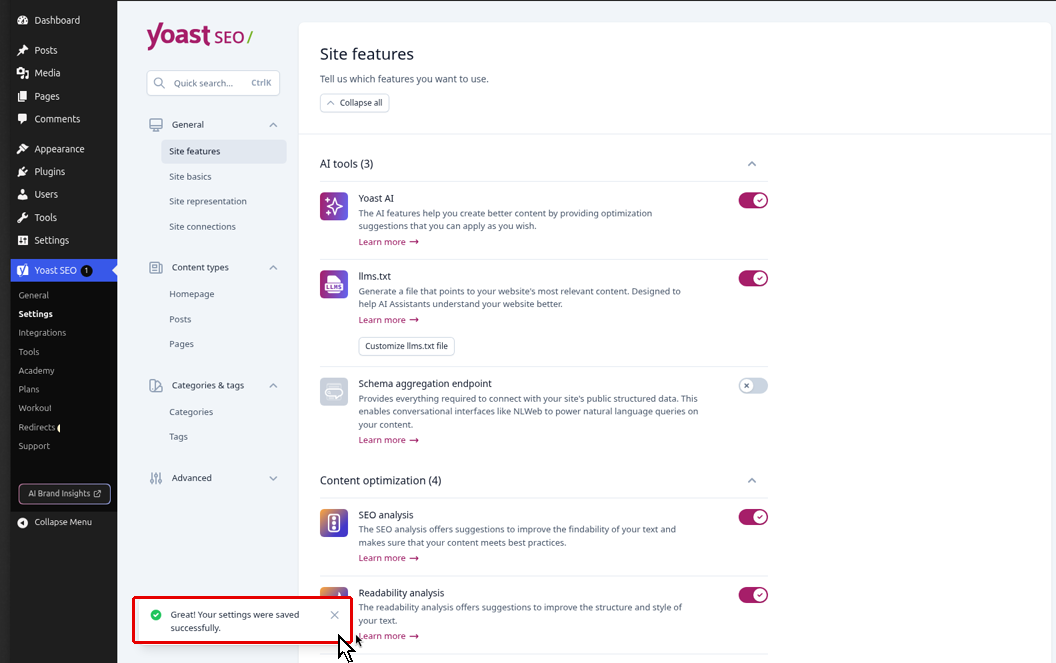
You will see a message that says “Great! Your settings were saved successfully.” As a result, Yoast now creates your llms.txt file.
Step 3: Choose Which Pages to Include (Optional)
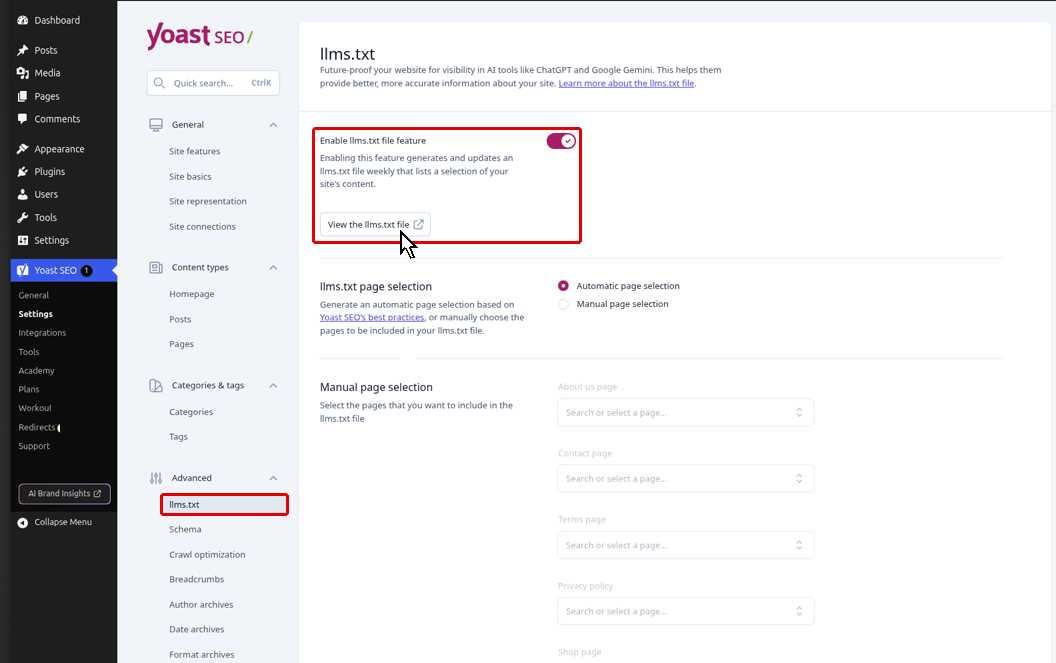
- Click the Customize llms.txt file button on the same card, or go to Advanced > llms.txt in the Yoast settings menu.
- Here you can also see the Enable llms.txt file feature toggle. Yoast generates the file and updates it every week.
- Under llms.txt page selection, keep Automatic page selection if you want Yoast to pick your pages. Choose Manual page selection if you want to pick your About us, Contact, Terms, Privacy policy and Shop pages yourself.
- Click Save changes if you changed anything, then click View the llms.txt file.
After that, your llms.txt file opens in a new tab. It starts with your site title and tagline, followed by a line that says it was generated by Yoast SEO, then a Categories section and an Optional section with a link to your sitemap.

Finally, you can learn more about this feature in the Yoast guide to enabling llms.txt.
Method 2: How to Enable llms.txt in WordPress with Rank Math
Rank Math also includes llms.txt in its free version. It calls the feature the LLMS Txt module.
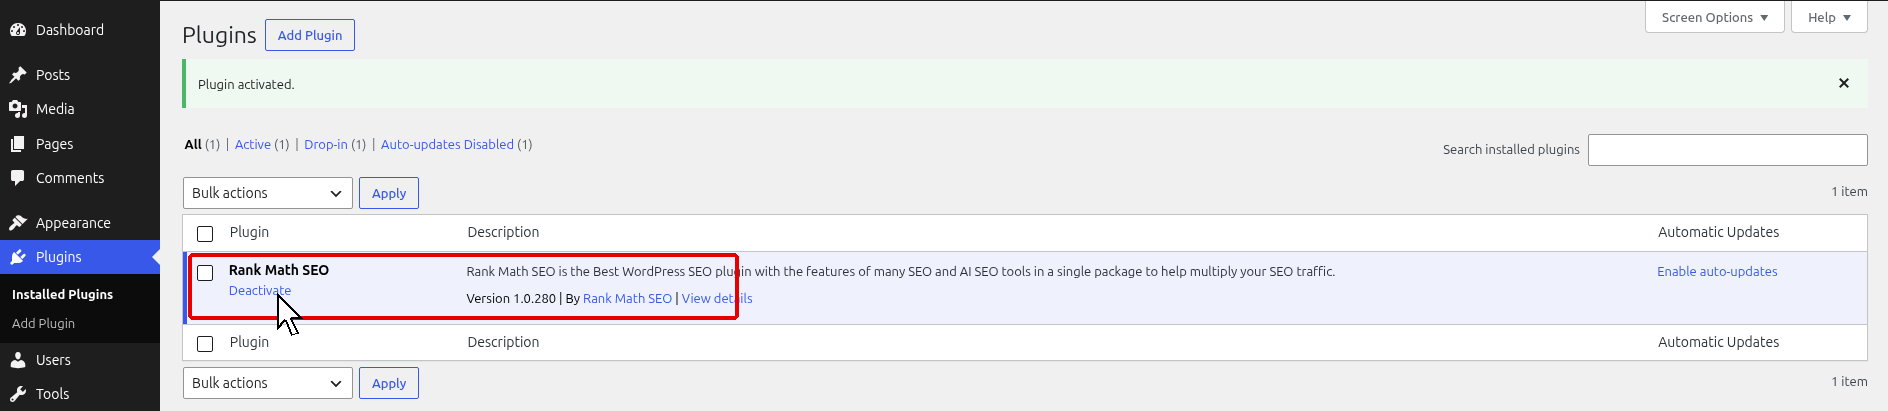
Step 1: Install and Activate Rank Math
- Go to Plugins > Add Plugin, search for Rank Math SEO, then install and activate it.
- If the setup wizard opens, you can complete it or click Skip Step to go straight to the dashboard.
- After that, you will see Rank Math SEO in the left menu.
Step 2: Turn On the LLMS Txt Module
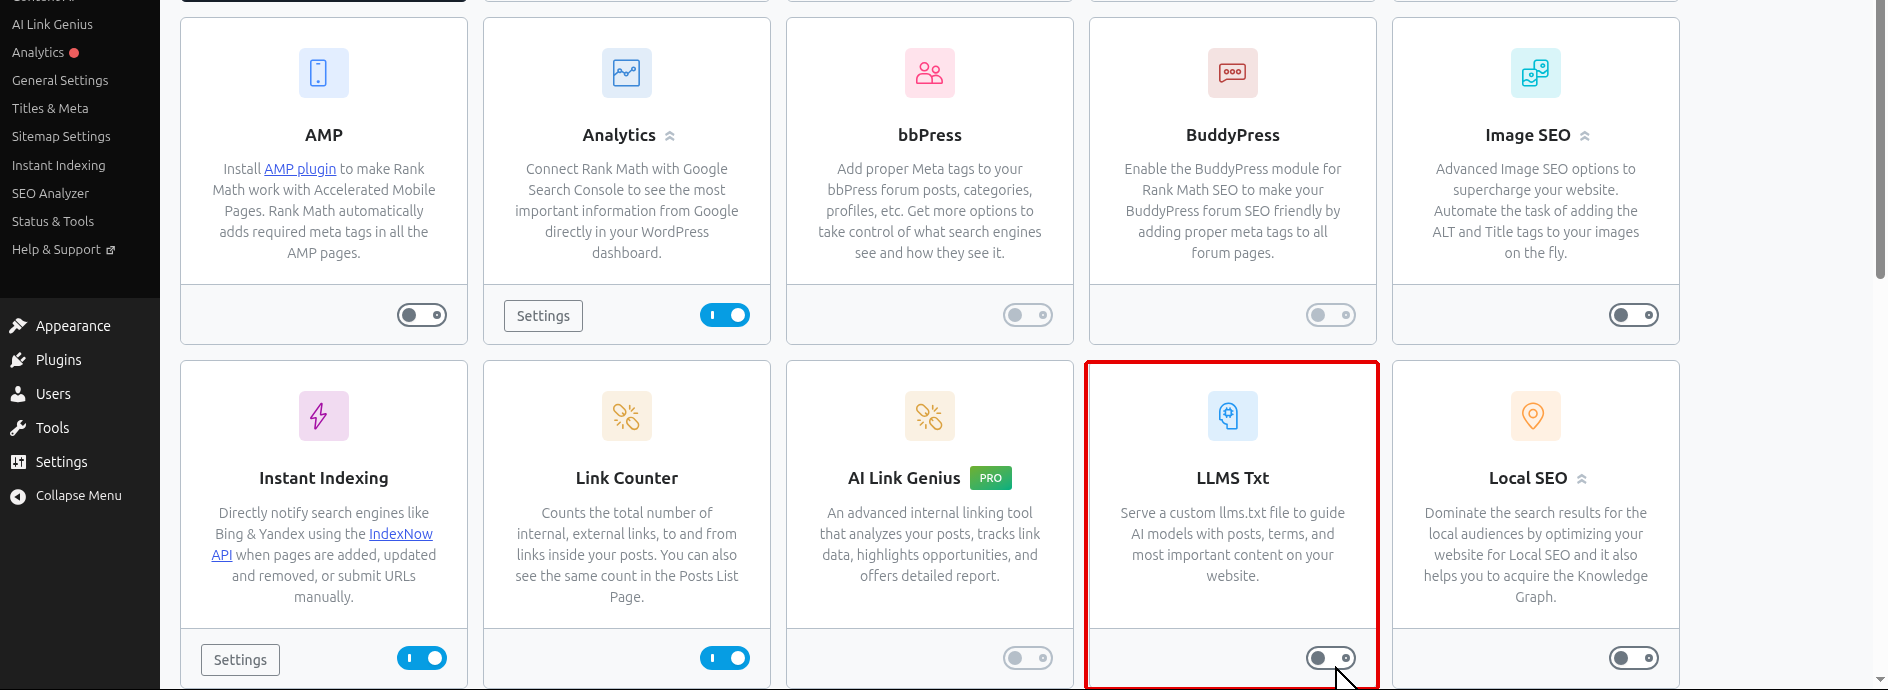
- Go to Rank Math SEO > Dashboard and open the Modules tab.
- Then scroll down to the LLMS Txt card. It says “Serve a custom llms.txt file to guide AI models with posts, terms, and most important content on your website.”
- Finally, click the toggle on this card to turn the module on.
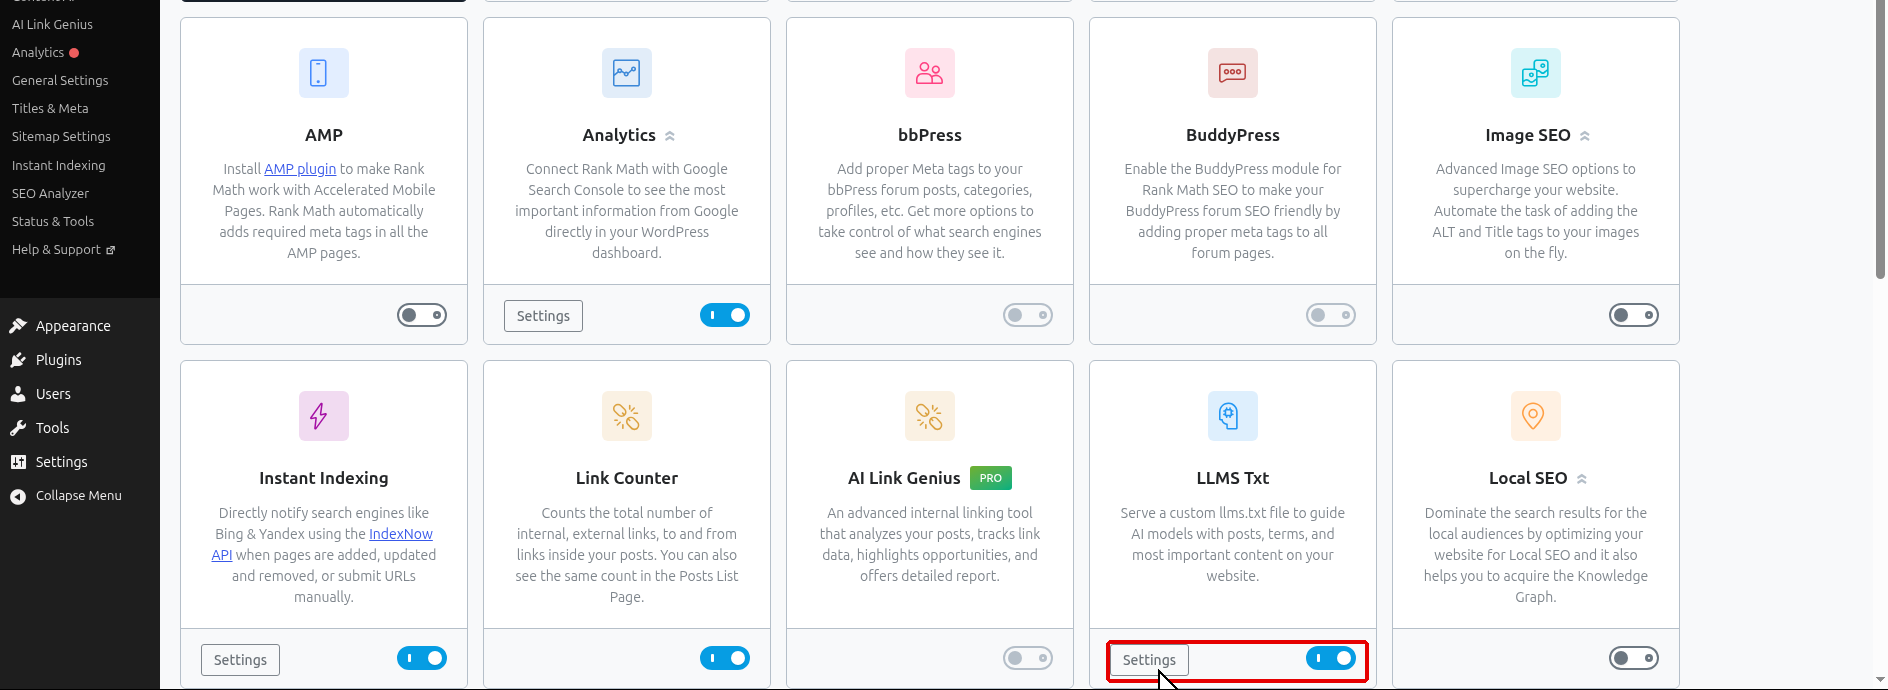
Once the module is on, the toggle turns blue and a Settings button appears on the card. Next, click Settings.
Step 3: Set Up Your llms.txt File
- The Edit llms.txt tab opens under Rank Math SEO > General Settings. At the top, a notice shows the address of your file: “Your llms.txt file is available at: yoursite.com/llms.txt”.
- Under Select Post Types, keep Posts and Pages ticked.
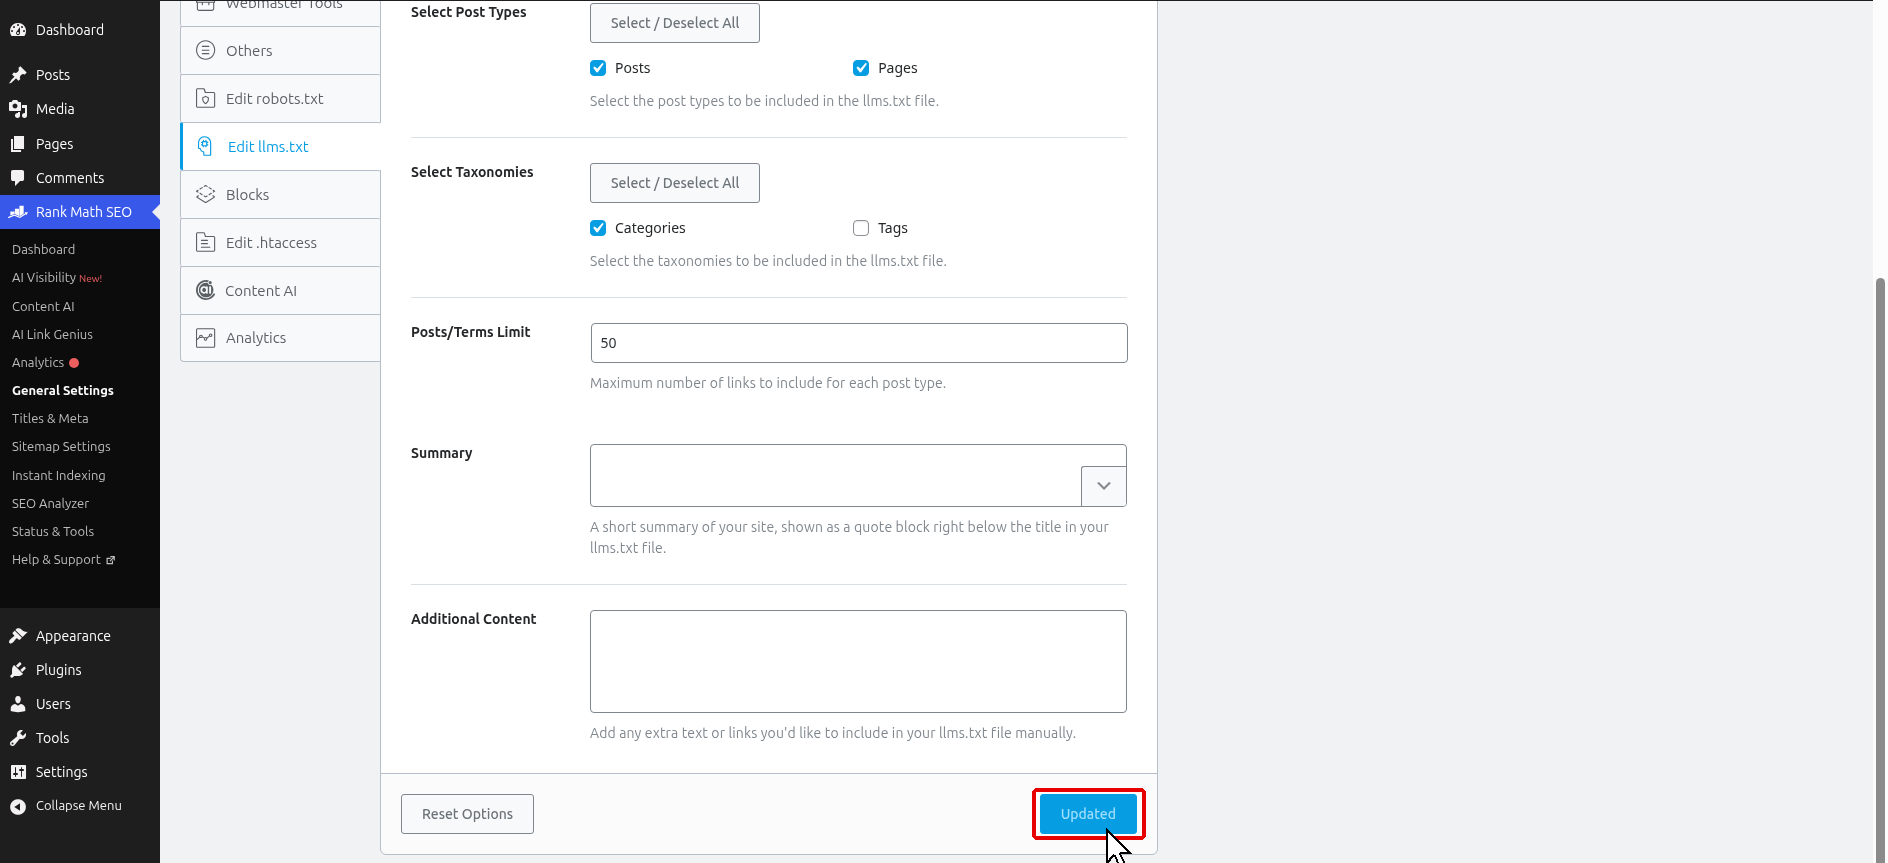
- Under Select Taxonomies, tick Categories. You can tick Tags too, but categories are usually enough.
- In Posts/Terms Limit, leave the default of 50 or change it. This is the highest number of links listed for each post type.
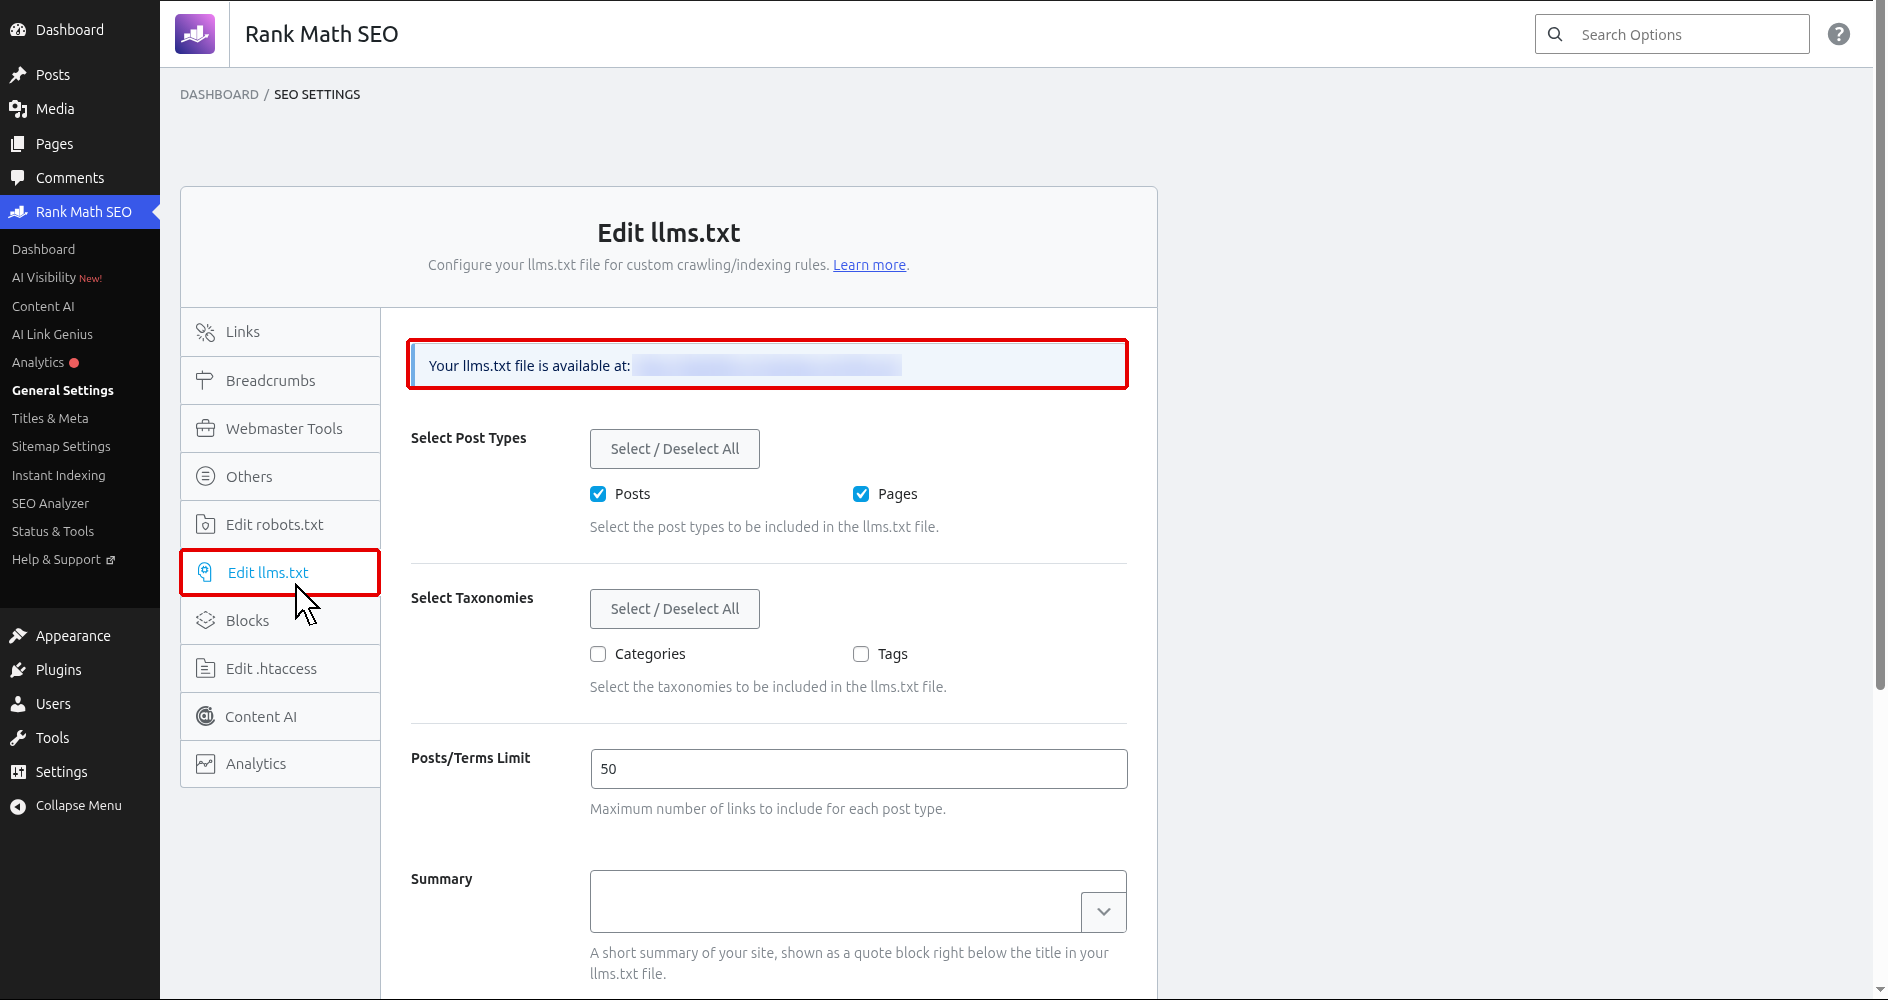
- Optionally, write a short description of your website in the Summary box. It appears as a quote right below your site title.
- Also, use Additional Content if you want to add extra text or links by hand.
- Click Save Changes. The button changes to Updated when your settings are saved.
Now open yoursite.com/llms.txt in your browser. Rank Math lists your site name, your XML sitemap, and then your posts, pages and categories with short descriptions.

For all the options, see the Rank Math llms.txt knowledge base article.
How to Check If Your llms.txt File Is Working
Whichever plugin you used, checking llms.txt in WordPress is easy. Just follow these steps:
- First, open a new browser tab and type yoursite.com/llms.txt (replace yoursite.com with your own domain).
- You should see a plain text page that starts with your site name and lists your links.
- Then click a few of the links to make sure they open the right pages.
- If you see an old version or a 404 page, clear your cache and check again in a private window.
Also make sure the pages listed in the file are the ones you really want AI tools to see. In addition, if you have a sitemap set up, the file links to it too. Learn more about sitemaps in our post on the WordPress XML sitemap.
llms.txt Not Working? Common Problems and Fixes
llms.txt Shows a 404 Error
This usually means WordPress has not refreshed its rewrite rules. Go to Settings > Permalinks and click Save Changes without changing anything. After that, clear your caching plugin, your hosting cache and any CDN cache like Cloudflare, and check the file again.
A Physical llms.txt File Is Blocking the Plugin
If someone uploaded a real llms.txt file to your website’s root folder, your server shows that file instead of the one your plugin creates. As a result, your plugin settings will seem to do nothing. To check, log in to your hosting account, open the File Manager and look for llms.txt inside public_html. If you are on GoDaddy, here is how to access cPanel in GoDaddy hosting. Remove or rename that file only if you are sure you want the plugin version, and take a backup first.
Yoast also says that if you see the message “Your llms.txt file couldn’t be auto generated”, you should ask your host to check the file permissions of your server.
Two SEO Plugins Are Active
If both Yoast SEO and Rank Math are active, they can fight over the same llms.txt address and you may see the wrong file. So keep only one SEO plugin active and turn off llms.txt in the other one, or better, remove it.
The File Does Not Show New Posts
Yoast updates the file once a week, so new posts may not show right away. On the other hand, in Rank Math, check that the post type is ticked and that the Posts/Terms Limit is not too low. Besides that, clearing your cache also helps.
Conclusion
That’s it! You now know how to enable llms.txt in WordPress with Yoast SEO or Rank Math, both for free. Simply pick the SEO plugin you already use, then turn on the feature, save and check yoursite.com/llms.txt.
Of course, llms.txt is still a new idea and AI tools may or may not use it. However, it takes only a few minutes and keeps your site ready for AI search. If you have any questions, let us know in the comments below.
Frequently Asked Questions
llms.txt is a plain text file at yoursite.com/llms.txt that gives AI tools a short summary of your website and links to your most important content. In WordPress, Yoast SEO and Rank Math can create it for you.
Yes. Both Yoast SEO and Rank Math include the llms.txt feature in their free versions. You do not need a premium plan.
llms.txt does not change your Google rankings. It is meant for AI tools, not search engines, so it will not help or hurt your normal SEO.
llms.txt is still a proposed standard, and not every AI company has confirmed that its tools read the file. Adding it is free and harmless, so many site owners add it to be ready.
robots.txt tells bots which pages they can or cannot crawl. llms.txt does not block anything. It only points AI tools to your most useful content.
In Yoast SEO, turn off the llms.txt toggle in Settings, Site features and save. In Rank Math, turn off the LLMS Txt module in the Dashboard. Then clear your cache.